About

Blogger Tips and TricksLatest Tips For BloggersBlogger Tricks

Blogger Tips and TricksLatest Tips For BloggersBlogger Tricks
Showing posts with label NETWORK PENTEST. Show all posts

Thursday, 29 June 2017

TheFatRat v1.9: Create backdoor & bypass AV

Thefatrat

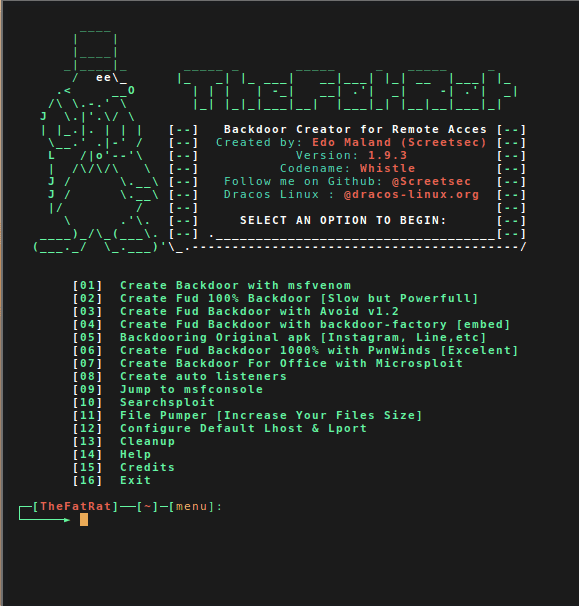
An easy tool to generate backdoor and easy tool to post exploitation attack like browser attack,dll . This tool compiles a malware with popular payload and then the compiled malware can be execute on windows, android, mac . The malware that created with this tool also have an ability to bypass most AV software protection.

Automating metasploit functions

  • Create backdoor for windows , linux , mac and android
  • bypass antivirus backdoorr
  • Checks for metasploit service and starts if not present
  • Easily craft meterpreter reverse_tcp payloads for Windows, Linux, Android and Mac and another
  • Start multiple meterpreter reverse_tcp listners
  • Fast Search in searchsploit
  • Bypass AV
  • File pumper
  • Create backdoor with another techniq
  • Autorunscript for listeners ( easy to use )
  • Drop into Msfconsole
  • Some other fun stuff

Change log v1.9

  • v1.9.4 – Fatrat will be full terminal mode , Powerstage tool added , Setup script rebuilded
  • v1.9.3 – Added update script
  • v1.9.3 – Dex2Jar will be installed from now on from Fatrat setup manually on user system (reason: Kali repo still uses old version)
  • v1.9.3 – Updated Android build tools to V.26 RC1 & Android Platform V. 25-R03
  • v1.9.3 – Updated dana travis backdoor-apk to 0.2.2 into fatrat / added openssl in setup
  • v1.9.2 – Msfvenom Android rat will be signed with android certificate , so it can be installed properly
  • v1.9.2 – Implemented Default Lhost & Lport config to fatrat & powerfull shell creator
  • v1.9.2 – Fixed payload in pnwinds option2
  • v1.9.2 – Implemented Stop functions in pnwinds
  • v1.9.2 – New signing process in old method backdoor apk & option to create listener
  • v1.9.2 – Implemented possibility for user to save msfconsole listeners
  • v1.9.2 – Fixes in Microsploit
  • v1.9.2 – Implemented local ip , public ip & hostname display to powerfull.sh
  • v1.9.2 – Implemented local ip , public ip & hostname display before user set Lhost
  • v1.9.2 – Implemented log creation for microsploit & fixed bugs
  • v1.9.2 – Added effective way to detect user linux distribution
  • v1.9.2 – Setup.sh ( patched )
  • v1.9.2 – bug in microsploit ( patched )
  • v1.9.2 – delt some function and variable
  • v1.9.1 – v1.9.1 – Implemented Microsploit (Office Exploitation Tool)
  • v1.9b – Implemented Backdoor-apk from Dana James Traversie in this version .{ Less tools to install during setup.sh }
  • v1.9.0 – update script setup.sh
  • v1.9.0 – del some variable and function
  • v1.9.0 – fixed typo and bugs
  • v1.9.0 – Backdoor APKS have a new payload hiding method in rat apk to not be detected .
  • v1.9.0 – APK (5) rat rebuild totally changed .(adapted backdoor-apk script to fatrat to both work together)
  • v1.9.0 – Apktool will not be installed no more by setup.sh , the same thing applies to : dx , zipalign (apktool on debian repo is 2.2.1 , and that version have a bug that gives error on compiling the apks , so , apktool and android tools were updated to latest version 25.0.2 and embeded in (tools) directory of fatrat .

Download & Installation
git clone https://github.com/Screetsec/TheFatRat.git
cd TheFatRat
chmod +x setup.sh && ./setup.sh
Source: Github

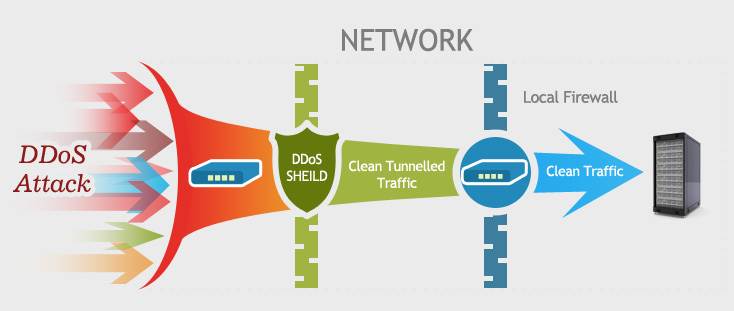
15 things against DDoS attacks

Today i am going to describes the 15 things against DDoS attacks
DDoS attacks mainly to two categories: bandwidth exhaustion attacks and resource exhaustion attacks, in order to effectively curb these two types of attacks, you can follow the steps listed in this article.

To combat DDoS (distributed denial of service) attacks, you need to have a clear understanding of what happened on the attack. Simply put, DDoS attacks through the use of server vulnerabilities, or resources (such as memory, hard disk consumption on the server etc.) to achieve the purpose. Tou can follow the steps listed below to do:
  1. If only a few computers are the source of the attack and you have identified the IP addresses for those sources, you place an ACL (access control list) on the firewall server to block these access from those IPs. If possible, change the IP address of the web server for a period of time, but if the attacker resolves your newly configured IP by querying your DNS server, this is no longer valid.
  2. If you are sure that the attack comes from a particular country, consider blocking the IP from that country, at least for a while.
  3. Monitoring the incoming network traffic. In this way you can know who is visiting your network and can monitor the exception to the visitor, which can analyze the log and source IP afterwards. Before a large-scale attack, an attacker could use a small number of attacks to test the robustness of your network.
  4. The most effective (and expensive) solution for bandwidth-consuming attacks is to buy more bandwidth.
  5. You can also use high-performance load balancing software, the use of multiple servers, and deployed in different data centers.
  6. The use of load balancing for web and other resources, while also using the same strategy to protect DNS.
  7. Optimize the use of resources to improve web server load capacity. For example, the use of apache can install apachebooster plug-in, the plug-in and varnish and nginx integration, you can deal with the sudden increase in traffic and memory footprint.
  8. The use of highly scalable DNS devices to protect DDOS attacks against DNS. Consider the commercial solution for Cloudflare, which can provide DDOS attack protection for DNS or TCP/IP from layer 3 to layer 7.
  9. Enable the router or firewall anti-IP spoofing function. CISCO ASA firewall in the configuration of the function than in the router more convenient. Enable this feature in ASDM (Cisco Adaptive Security Device Manager) by clicking “Firewall” in “Configuration”, finding “anti-spoofing” and clicking Enable. You can also use the ACL (access control list) in the router to prevent IP spoofing, first for the network to create ACL, and then applied to the Internet interface.
  10. The use of third-party services to protect your site. There are many companies have such services, providing high-performance basic network facilities to help you resist denial of service attacks. You only need to pay hundreds of dollars a month on the line.
  11. Pay attention to the security configuration of the server, to avoid resource exhaustion DDOS attacks.
  12. Listen to the views of experts, for the attack in advance to respond to the emergency program.
  13. Monitoring the network and web traffic. If it is possible to configure multiple analysis tools, such as Statcounter and Google analytics, you can more visually understand the pattern of traffic changes and get more information from it.
  14. To protect DNS to avoid DNS amplification attacks.
  15. Disable ICMP on the router. Open ICMP only when testing is required. The following strategies are also considered when configuring the router: flow control, packet filtering, half-connection timeout, garbage packet discard, source forged packet drop, SYN threshold, disable ICMP and UDP broadcast

Monday, 26 June 2017

Hijacker v1-stable: Wireless Toolkit Application for Android

Hijacker

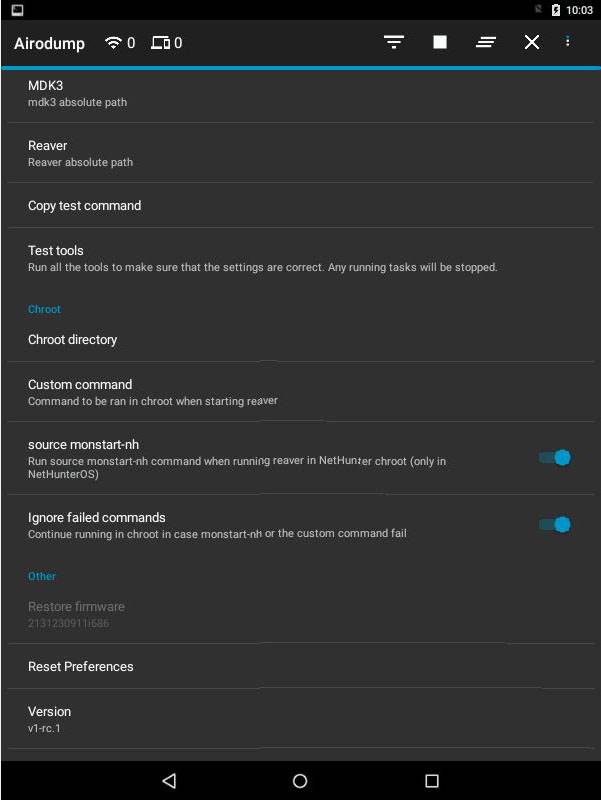
Hijacker is a Graphical User Interface for the wireless auditing tools airodump-ng, aireplay-ng and mdk3. It offers a simple and easy UI to use these tools without typing commands in a console and copy&pasting MAC addresses.
This application requires an android device with a wireless adapter that supports Monitor Mode. A few android devices do, but none of them natively. This means that you will need a custom firmware. Nexus 5 and any other device that uses the BCM4339 (and BCM4358 (although injection is not yet supported so no aireplay or mdk)) chipset will work with Nexmon. Also, devices that use BCM4330 can use bcmon. An alternative would be to use an external adapter that supports monitor mode in Android with an OTG cable.
The required tools are included in the app. To install them go to Settings and click “Install Tools”. This will install everything in the directory you select. If you have already installed them, you don’t have to do anything. You can also have them at any directory you want and set the directories in Settings, though this might cause the wireless tools not being found by the aircrack-ng suite. The Nexmon driver and management utility is also included.
Root is also necessary, as these tools need root to work. If you don’t grant root permissions to it, it hangs… for some reason… don’t know why…
Features:
  • View a list of access points and stations (clients) around you (even hidden ones)
  • View the activity of a network (by measuring beacons and data packets) and its clients
  • Deauthenticate all the clients of a network
  • Deauthenticate a specific client from the network it’s connected
  • MDK3 Beacon Flooding with custom SSID list
  • MDK3 Authentication DoS for a specific network or to everyone
  • Try to get a WPA handshake or gather IVs to crack a WEP network
  • Statistics about access points (only encryption for now)
  • See the manufacturer of a device (AP or station) from a OUI database (pulled from IEEE)
  • See the signal power of devices and filter the ones that are closer to you
  • Leave the app running in the background, optionally with a notification
  • Copy commands or MAC addresses to clipboard, so you can run them in a terminal if something goes wrong
  • Include the tools
  • Reaver WPS cracking (pixie-dust attack using NetHunter chroot and external adapter)
  • .cap files cracking with custom wordlist
  • Save captured packets in .cap file
  • Create custom commands to be ran on an access point or a client with one click
Installation:
Make sure:
  • you are on Android 5+
  • you are rooted. SuperSU is required. If you are on CM, install SuperSU
  • have installed busybox (opened and installed the tools)
  • have a firmware to support Monitor Mode on your wireless interface
APK Download: Hijacker-release-v1.apk Source: https://github.com/chrisk44/Hijacker

[BlackHat Tool] apt2: automated penetration toolkit

APT2 – An Automated Penetration Testing Toolkit

This tool will perform an NMap scan, or import the results of a scan from Nexpose, Nessus, or NMap. The processesd results will be used to launch exploit and enumeration modules according to the configurable Safe Level and enumerated service information.
All module results are stored on localhost and are part of APT2’s Knowledge Base (KB). The KB is accessible from within the application and allows the user to view the harvested results of an exploit module.

Change log v1.0-20170613

+ Added packaging and fix apt2_whois
+ fixed issues with misc data files and installing packages.
+ module: temp fix till I get time to do a better one.

Setup

NOTE: APT2 is currently only tested on Linux based OSes. If you can confirm that it works on other OSes, please let us know.
On Kali Linux install python-nmap library:
  • pip install python-nmap
  • pip install pysmb
  • pip install yattag
  • pip install scapy
  • pip install ftputil
  • pip install msgpack-python

Current External Program/Script Dependencies

To make full use of all of APT2’s modules, the following external dependencies should be install on your system:
convert, dirb, hydra, java, john, ldapsearch, msfconsole, nmap, nmblookup, phantomjs, responder, rpcclient, secretsdump.py, smbclient, snmpwalk, sslscan, xwd

Configuration (Optional)

APT2 uses the default.cfg file in the root directory. Edit this file to configure APT2 to run as you desire.
Current options include:
  • metasploit
  • nmap
  • threading
Metasploit RPC API (metasploit)
APT2 can utuilize your host’s Metasploit RPC interface (MSGRPC). Additional Information can be found here: https://help.rapid7.com/metasploit/Content/api-rpc/getting-started-api.html
NMAP
Configure NMAP scan settings to include the target, scan type, scan port range, and scan flags. These settings can be configured while the program is running.
Threading
Configure the number of the threads APT2 will use.

Run:

No Options:

python apt2 or ./apt2

With Configuration File

python apt2 -C <config.txt>

Import Nexpose, Nessus, or NMap XML

python apt2 -f <nmap.xml>

Specify Target Range to Start

python apt2 -f 192.168.1.0/24

Safe Level

Safe levels indicate how safe a module is to run againsts a target. The scale runs from 1 to 5 with 5 being the safest. The default configuration uses a Safe Level of 4 but can be set with the -s or --safelevel command line flags.

Usage:

usage: apt2.py [-h] [-C <config.txt>] [-f [<input file> [<input file> ...]]]
[--target] [--ip <local IP>] [-v] [-s SAFE_LEVEL] [-b]
[--listmodules]
optional arguments:
-h, --help            show this help message and exit
-v, --verbosity       increase output verbosity
-s SAFE_LEVEL, --safelevel SAFE_LEVEL
set min safe level for modules
-b, --bypassmenu      bypass menu and run from command line arguments
inputs:
-C <config.txt>       config file
-f [<input file> [<input file> ...]]
one of more input files seperated by spaces
--target              initial scan target(s)
ADVANCED:
--ip <local IP>       defaults to ip of interface
misc:
--listmodules         list out all current modules

Modules

-----------------------
LIST OF CURRENT MODULES
-----------------------
nmaploadxml               Load NMap XML File
hydrasmbpassword          Attempt to bruteforce SMB passwords
nullsessionrpcclient      Test for NULL Session
msf_snmpenumshares        Enumerate SMB Shares via LanManager OID Values
nmapbasescan              Standard NMap Scan
impacketsecretsdump       Test for NULL Session
msf_dumphashes            Gather hashes from MSF Sessions
msf_smbuserenum           Get List of Users From SMB
anonftp                   Test for Anonymous FTP
searchnfsshare            Search files on NFS Shares
crackPasswordHashJohnTR   Attempt to crack any password hashes
msf_vncnoneauth           Detect VNC Services with the None authentication type
nmapsslscan               NMap SSL Scan
nmapsmbsigning            NMap SMB-Signing Scan
responder                 Run Responder and watch for hashes
msf_openx11               Attempt Login To Open X11 Service
nmapvncbrute              NMap VNC Brute Scan
msf_gathersessioninfo     Get Info about any new sessions
nmapsmbshares             NMap SMB Share Scan
userenumrpcclient         Get List of Users From SMB
httpscreenshot            Get Screen Shot of Web Pages
httpserverversion         Get HTTP Server Version
nullsessionsmbclient      Test for NULL Session
openx11                   Attempt Login To Open X11 Servicei and Get Screenshot
msf_snmplogin             Attempt Login Using Common Community Strings
msf_snmpenumusers         Enumerate Local User Accounts Using LanManager/psProcessUsername OID Values
httpoptions               Get HTTP Options
nmapnfsshares             NMap NFS Share Scan
msf_javarmi               Attempt to Exploit A Java RMI Service
anonldap                  Test for Anonymous LDAP Searches
ssltestsslserver          Determine SSL protocols and ciphers
gethostname               Determine the hostname for each IP
sslsslscan                Determine SSL protocols and ciphers
nmapms08067scan           NMap MS08-067 Scan
msf_ms08_067              Attempt to exploit MS08-067

DeathStar: automated domain infiltration tool

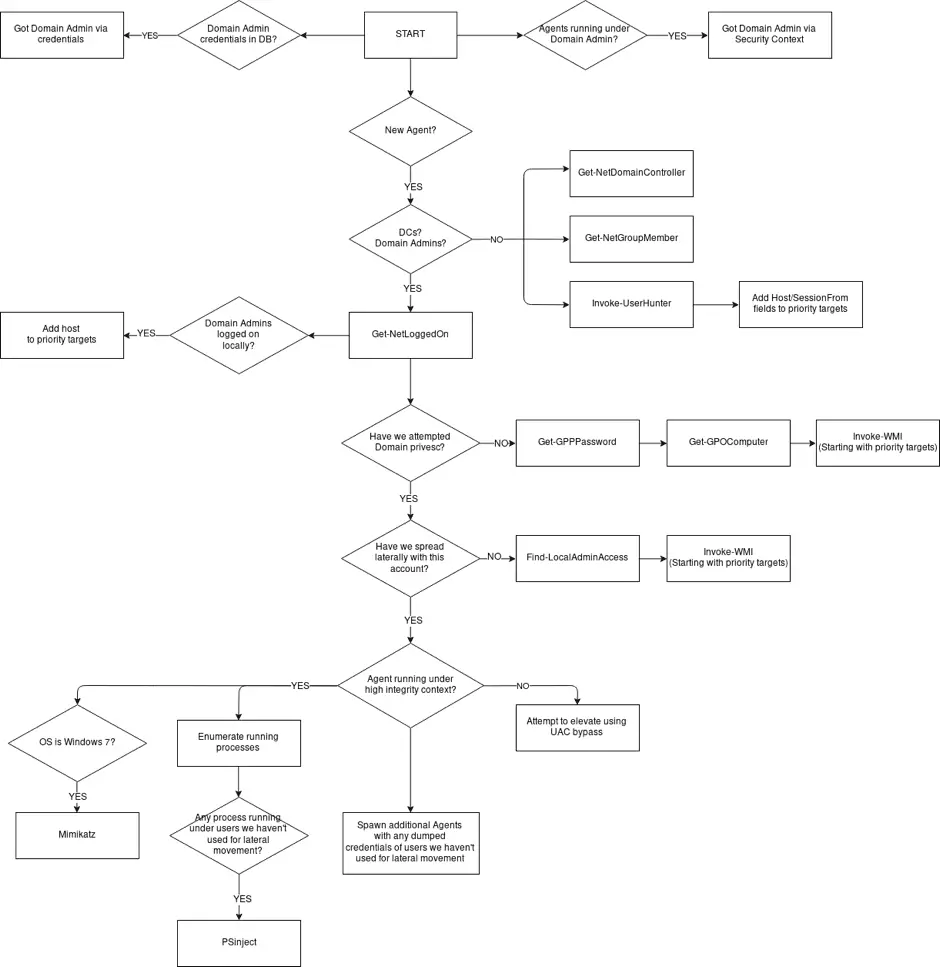
DeathStar is a Python script that uses Empire’s RESTful API to automate gaining Domain Admin rights in Active Directory environments using a variety of techinques.
The following picture can be a good explanation of DeathStar’s operating mechanism:

Installation

git clone https://github.com/byt3bl33d3r/Empire
cd Empire/setup && ./install.sh && cd ..
# Start the Empire console and RESTful API
python empire --rest --username empireadmin --password Password123
git clone https://github.com/byt3bl33d3r/DeathStar
# Death Star is written in Python3
pip3 install -r requirements.txt
./DeathStar.py


 Usage

  1. Run DeathStar
  2. Get an Empire Agent on a box connected to a Domain
  3. Go grab a coffee/tea/redbull, DeathStar will take care of everything else 😉

Demo

Source: Github